How to Integrate Tokens Into Your Development Workflow
Integrating design tokens from Figma with your code repository using Tokens Studio is a powerful way to maintain a consistent and efficient design-to-development workflow. This setup allows you to manage your design tokens with version control, ensuring that all team members are working with the latest updates, even when collaborating on different files.
In this module, we’ll present a step-by-step guide to setting up this integration using the Tokens Studio for Figma plugin. We’ll use GitHub as an example, but also provide an overview and resources for other repositories. If you are new to design systems and tokens, read our previous posts in the series here.
Syncing Tokens With a Repository
Since tokens are most useful in a team environment, it’s also essential to have a version control in place to ensure that token values remain updated while the team members are working on different files.
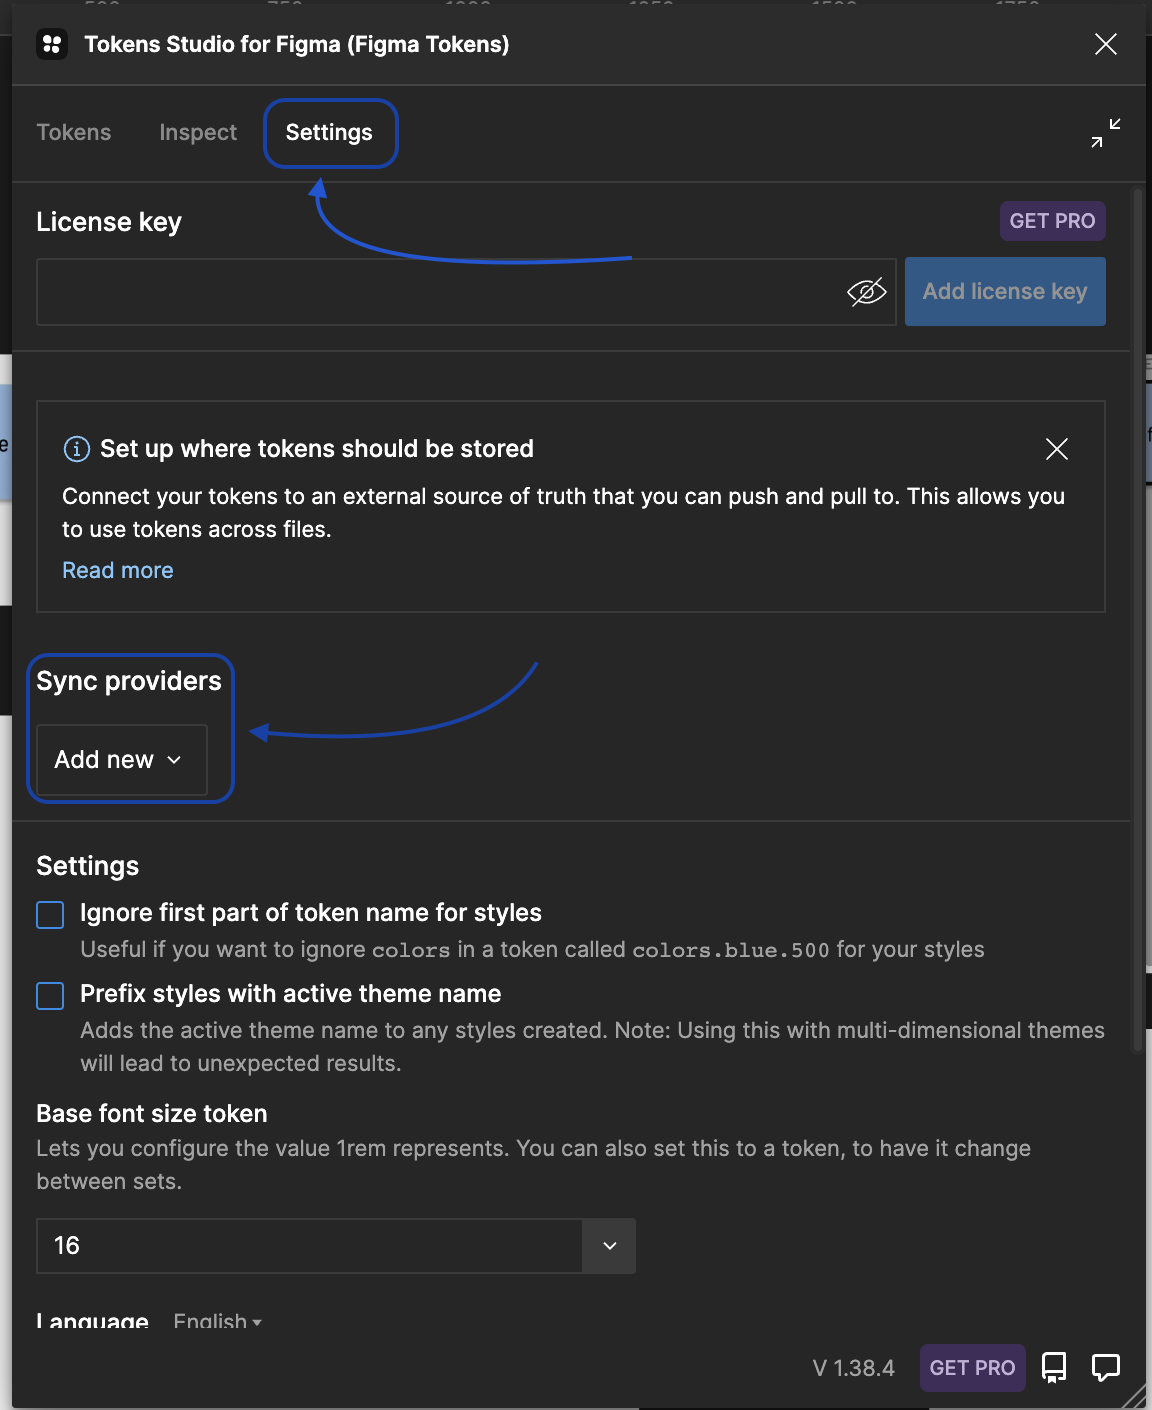
To select one of the sync providers, in the Settings tab, you should find the Add New button. You will find the following options in the menu.
Sync Options:
Designers have several options to sync tokens depending on your team’s needs. The following overview outlines the major options and some considerations for each. We’ll be using GitHub as our example, but you can find more information here.
Local Storage
- By default, all tokens are stored on the document that you're working in. If you need to work in multiple documents, this option won't work as it means you would have to copy paste your tokens to the other document.
URL
- Pulls tokens from a remote .json stored on your server. This is a read-only sync method.
Generic Versioned Storage
- An extension off of the URL storage. This storage provider supports read/only, read/write and read/write/create flows. Additionally it can be extended with arbitrary headers on the requests should you need more fine grained support for your end-point.
- You can use JSONBin.io by creating an account and syncing your tokens there. It's a free and easy way to sync your tokens, but they are not version controlled by default.
- The recommended way as it hosts your code and design decisions in the same location. By connecting to a repository, you can pull and push tokens or even select a branch to push to. This allows you to explore design decisions before deploying them to a production environment.
- Like GitHub, you can use GitLab to store your tokens in your repository.
- Allows you to store your tokens on ADO.
- Allows you to sync your tokens between Tokens Studio and Supernova.
Syncing With GitHub
Storing tokens on GitHub is beneficial as it’s version controlled; it allows you to work on different branches (think of a brand refresh that lives on a different branch than the current live version) and gives you varying access levels such as Read or Write access. You can also integrate GitHub Actions which will allow you to create a token pipeline with Style Dictionary or other tools.
To set up the Github sync for your file, follow these steps:
Step 1: Sign Up and Sign In to GitHub
- Sign up for an account at GitHub if you don’t already have one.
- Log in to your account.
- Create a new repository, name it and select your desired privacy settings
- Initialize it as README (a crucial step).
Step 2: Generate a Personal Access Token
In the Settings tab of your profile, scroll to the bottom to find Developer Settings where you should find Personal Access Tokens.
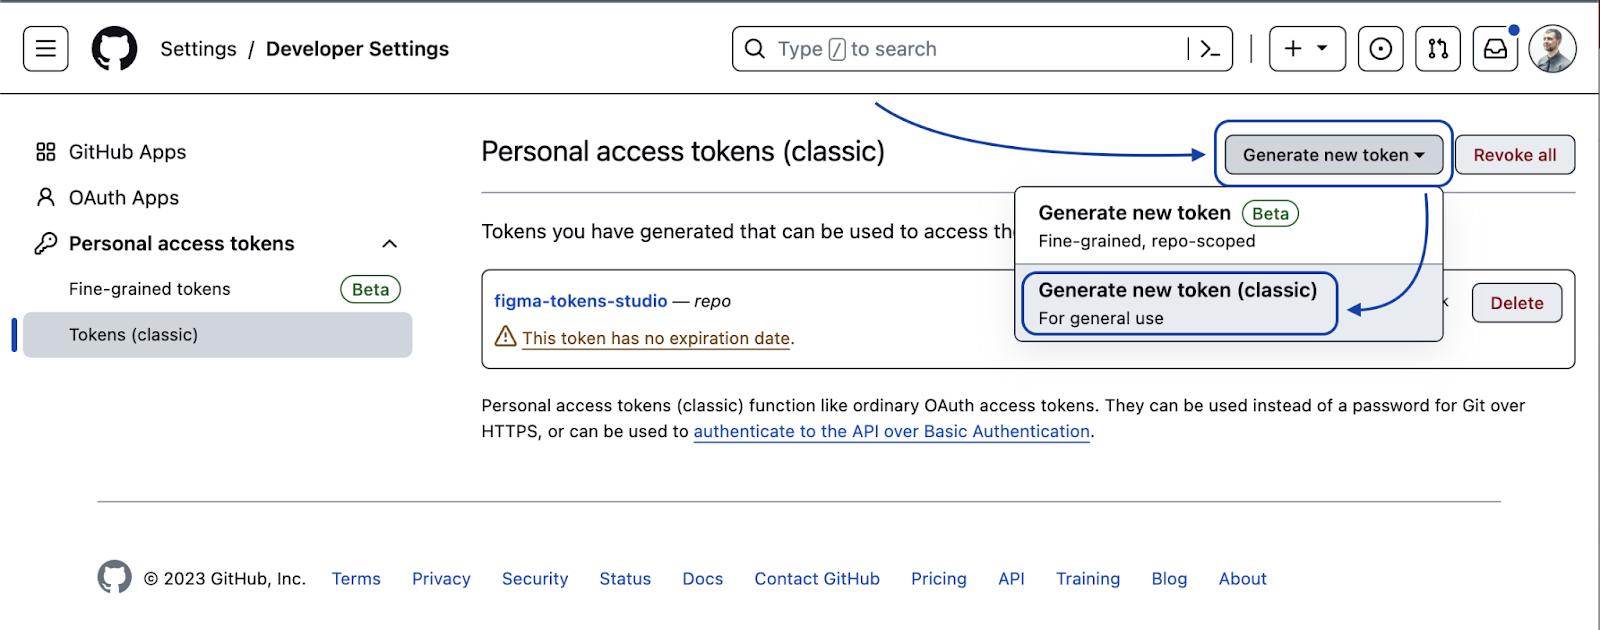
- Click on Generate new token.
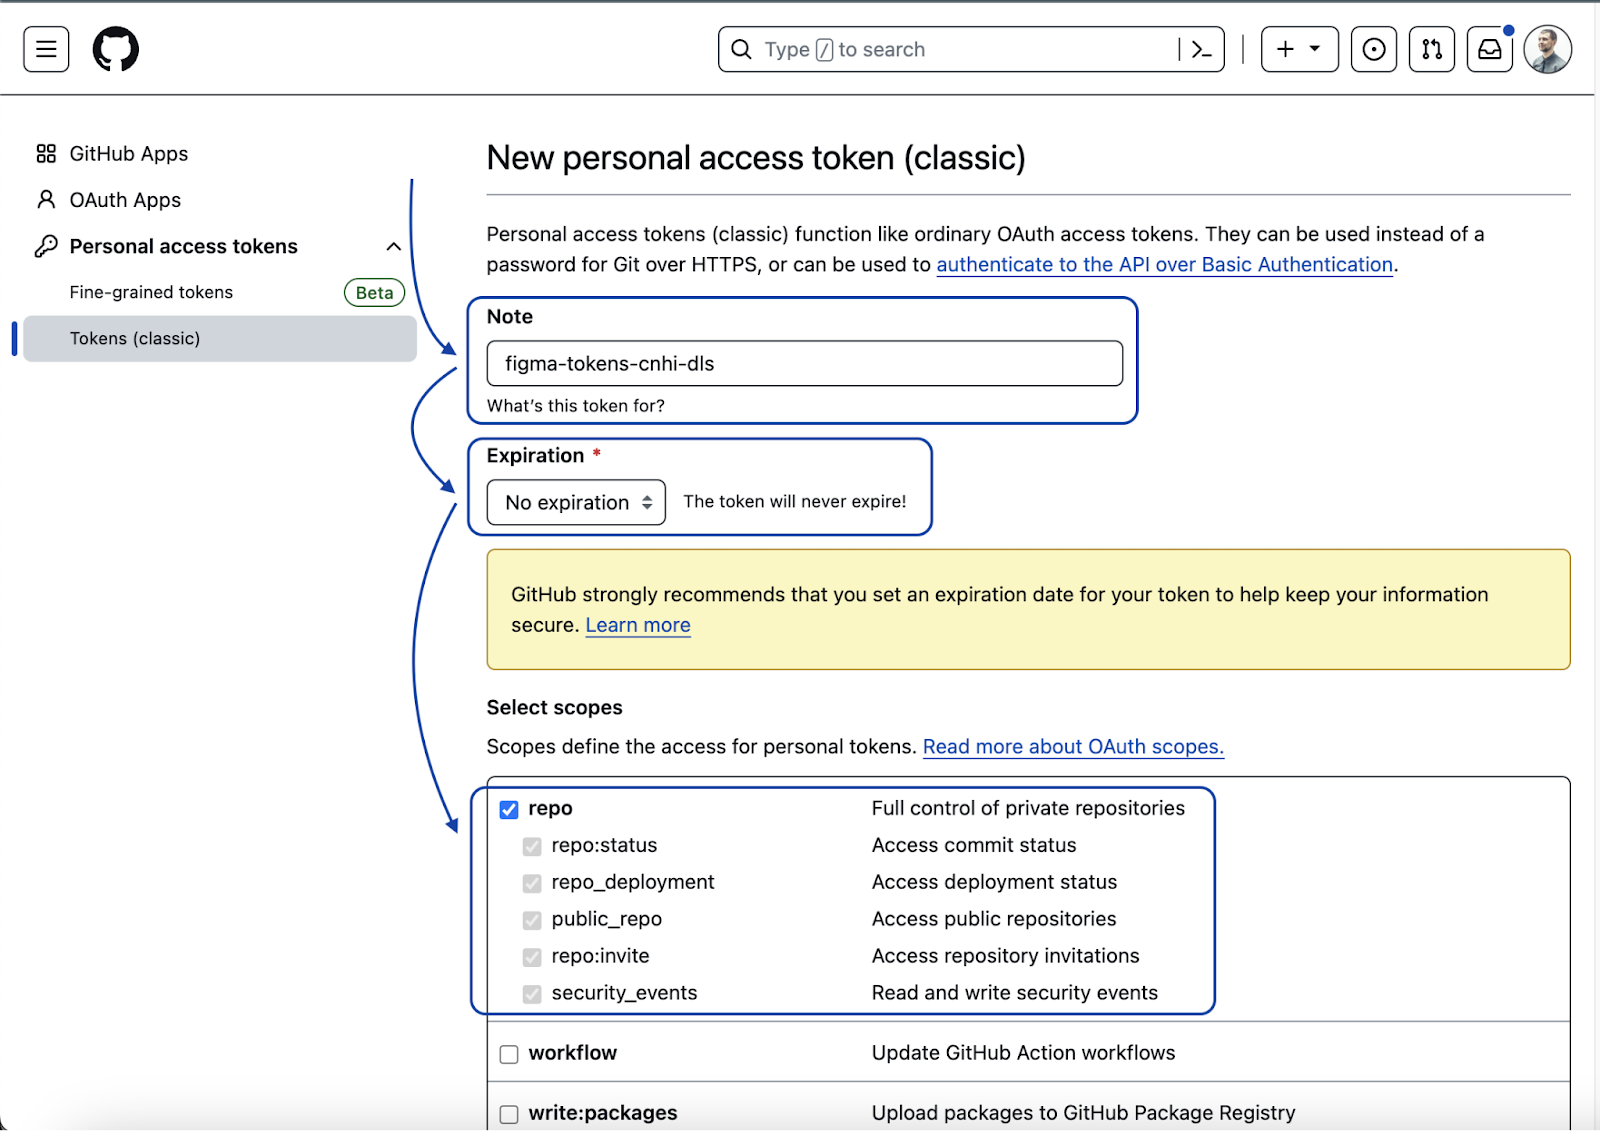
- On the New personal access token (classic) page, fill in the Note input with a description for the token.
- You can either create a personal access token with the older 'Tokens (Classic)', or with 'Fine-grained tokens':
- Set Expiration to No Expiration.
- Under the Select scopes section, check the Repo option.
- Click Generate token and copy the newly generated GitHub access token.
Once you’ve generated your token, make sure to copy and securely store it right away, as you won’t be able to retrieve it later if you close the page. It’s crucial to keep this token private and avoid sharing it with anyone who shouldn’t have access to your repository. Think of the token as you would your personal password—its security is paramount. If the token is ever exposed or shared by mistake, you should immediately revoke and delete it to protect your repository’s integrity.
Step 3: Configure Tokens Studio for Figma
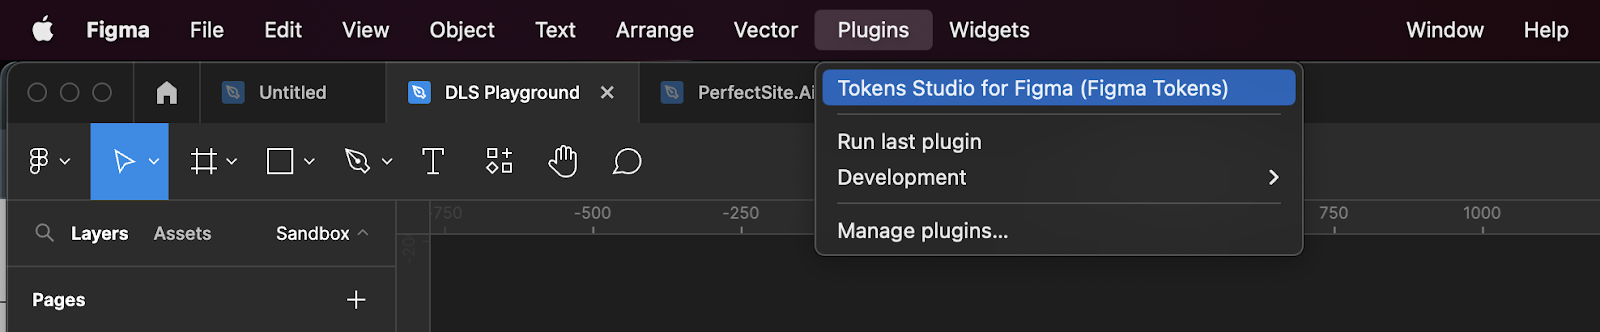
- Open your Figma project.
- Launch the Tokens Studio for Figma plugin.
- Switch to the Settings tab.
- Click on Add new sync provider and select the GitHub option.
Step 4: Set Up GitHub as a Sync Provider
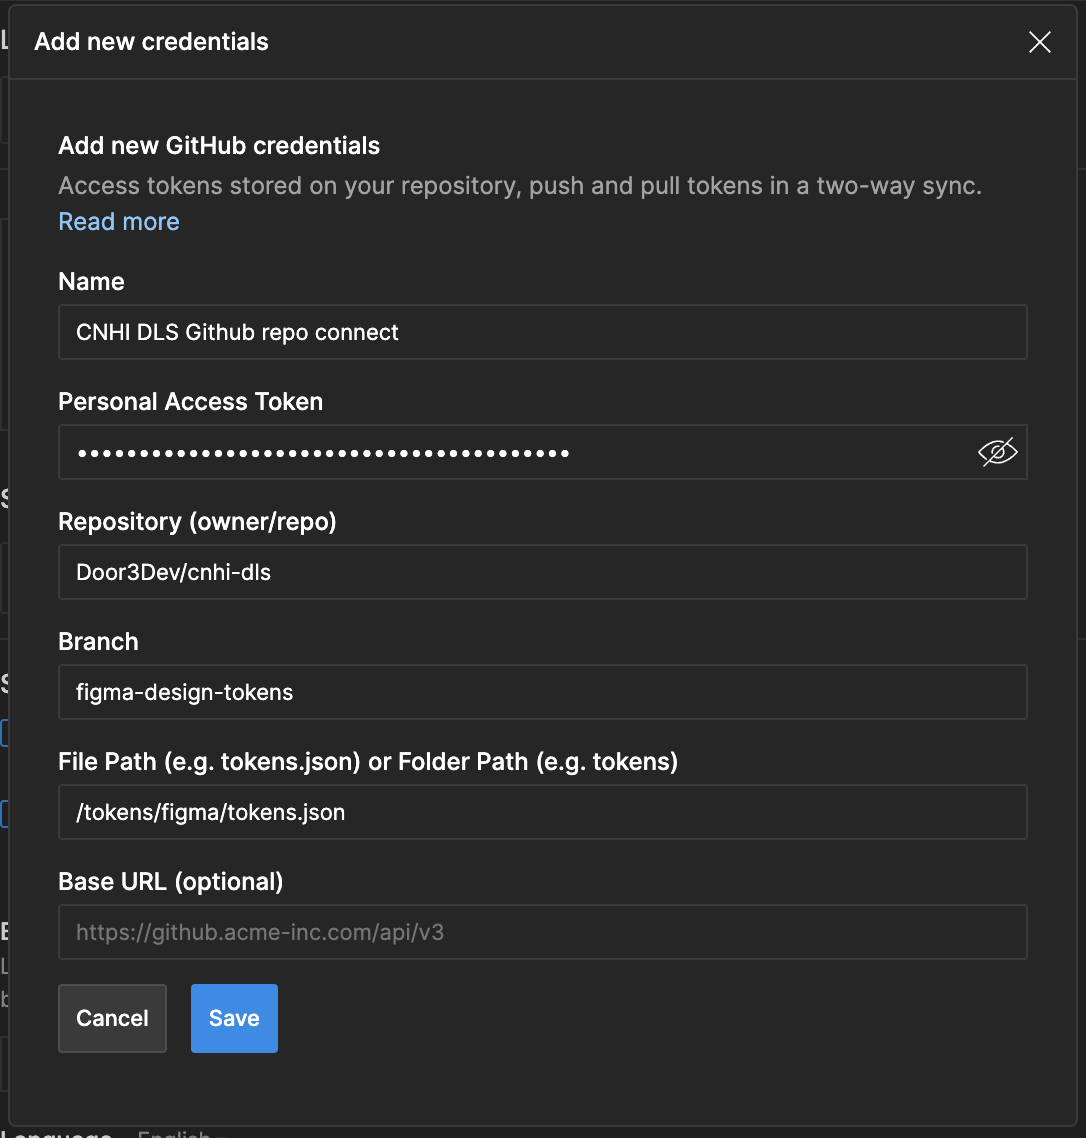
- Enter the Name of the sync provider connection (only on the plugin UI).
- Paste the Personal Access Token you generated in GitHub.
- Enter the Repository value (example tokens-studio/figma-plugin).
- Select the Git repository Branch where all changes for the Figma tokens will be pushed and pulled from - figma-design-tokens.
- Specify the file path where the Figma tokens are located inside the Git repository - /tokens/figma/tokens.json.
- Click the Save button.
Tip: If your repository currently only contains a README file without any token files, you can initiate the setup by entering a forward slash ‘/’ in the file path when you make your first commit through the plugin. This action will prepare your repository for use, allowing you to push your newly created tokens afterward.
Step 5: Sync Changes Between Figma and GitHub

After configuring the sync provider, you’ll notice a new set of items at the bottom of the Tokens Studio for Figma plugin window. This includes the GitHub branch name (figma-design-tokens) and two icons to pull changes from GitHub or push changes from Figma.
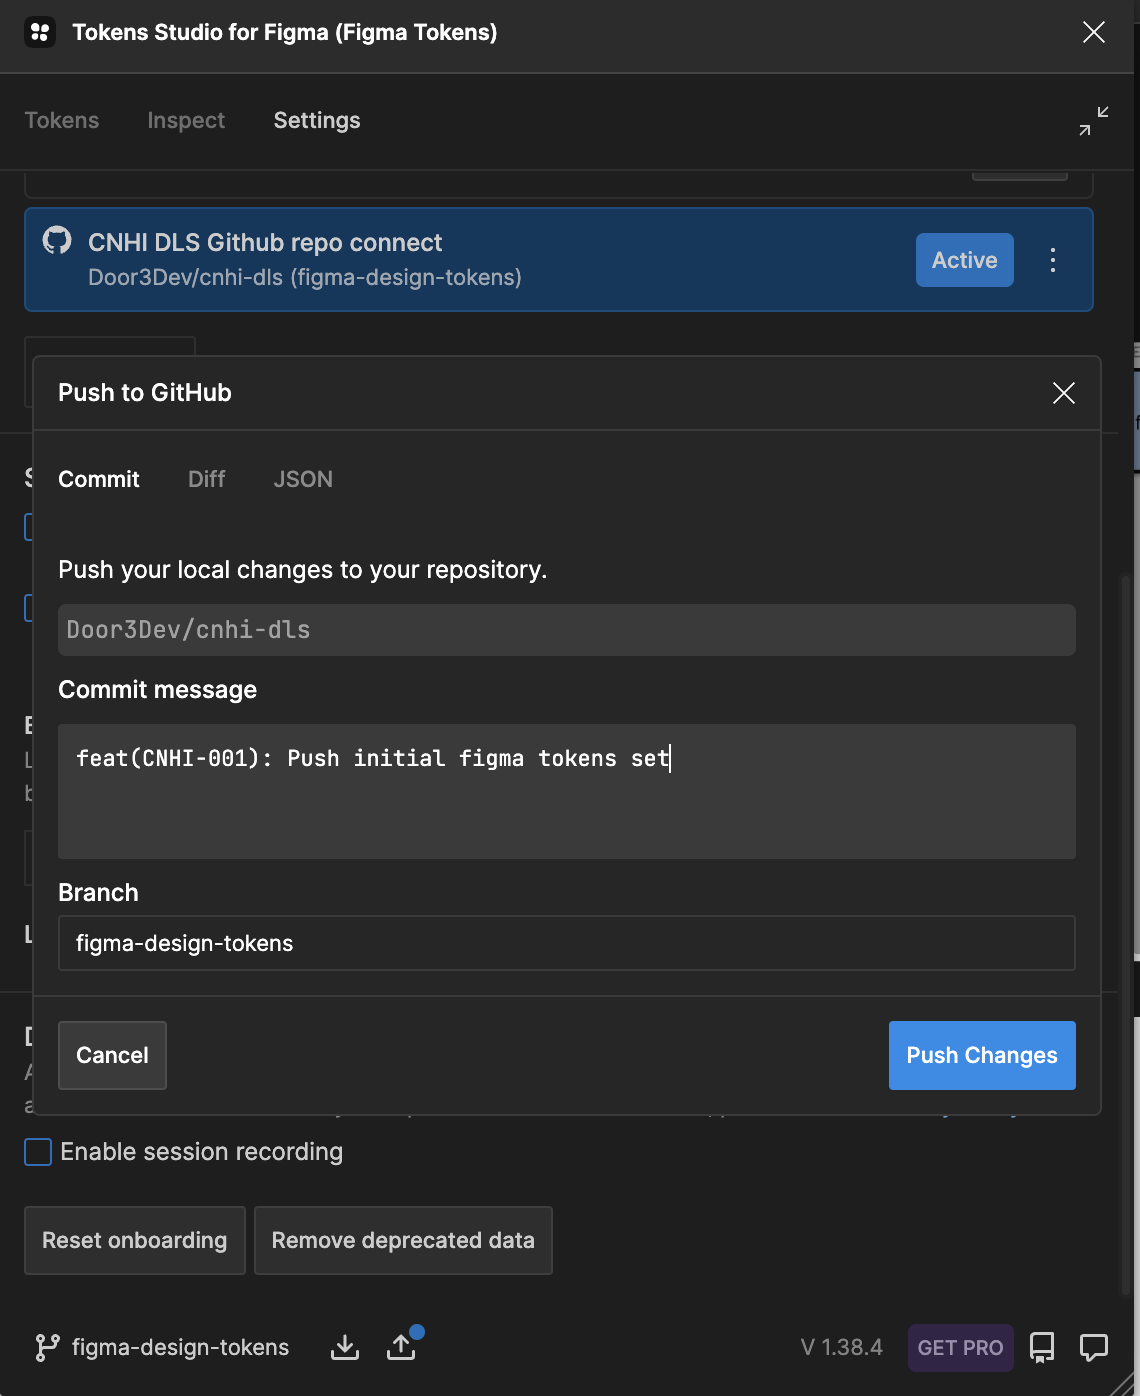
Once you’ve made local changes to the design tokens in Figma, click on the Push icon, which will be highlighted with a blue dot indicating changes have been made.
- A Push to GitHub modal will open, prompting you to enter a commit message, which should identify the action of later clarity.
- To finalize, click Push changes.
Note: You can also choose the branch to which you want to push, allowing you to experiment with new tokens on separate branches without affecting the main design system.
Step 6: Create a Pull Request
Once the setup is complete, you can start pushing and pulling tokens between Figma and GitHub.
To notify developers of your changes:
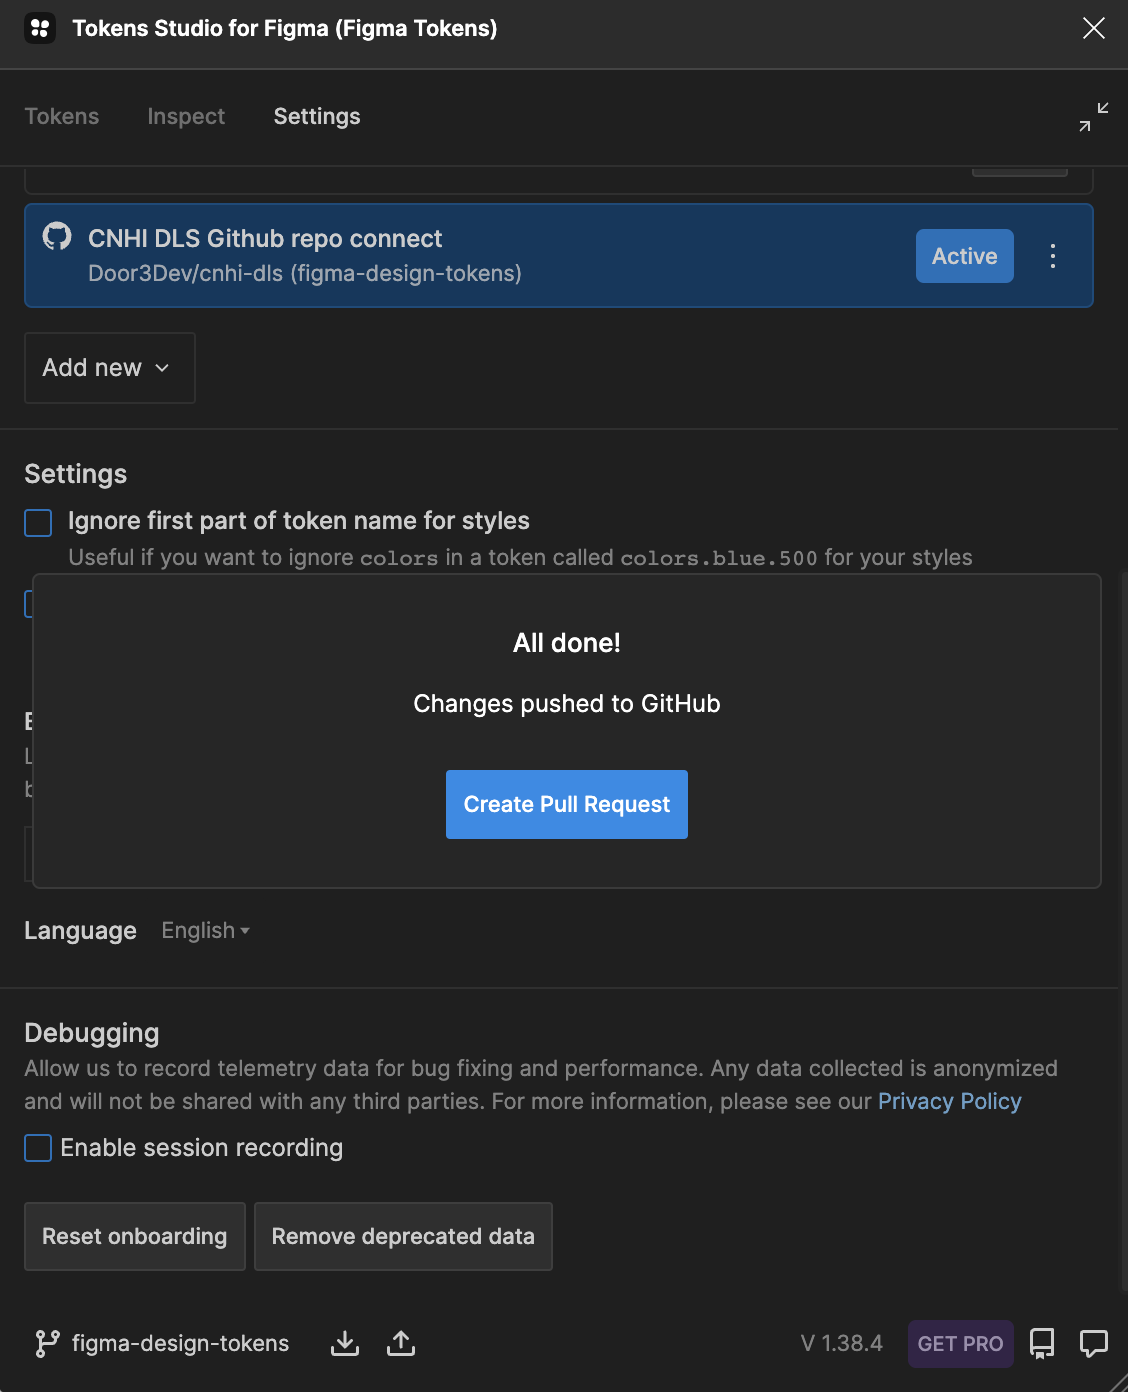
- After pushing changes, you’ll be prompted to Create Pull Request.
- Click the button, and you’ll be redirected to GitHub.
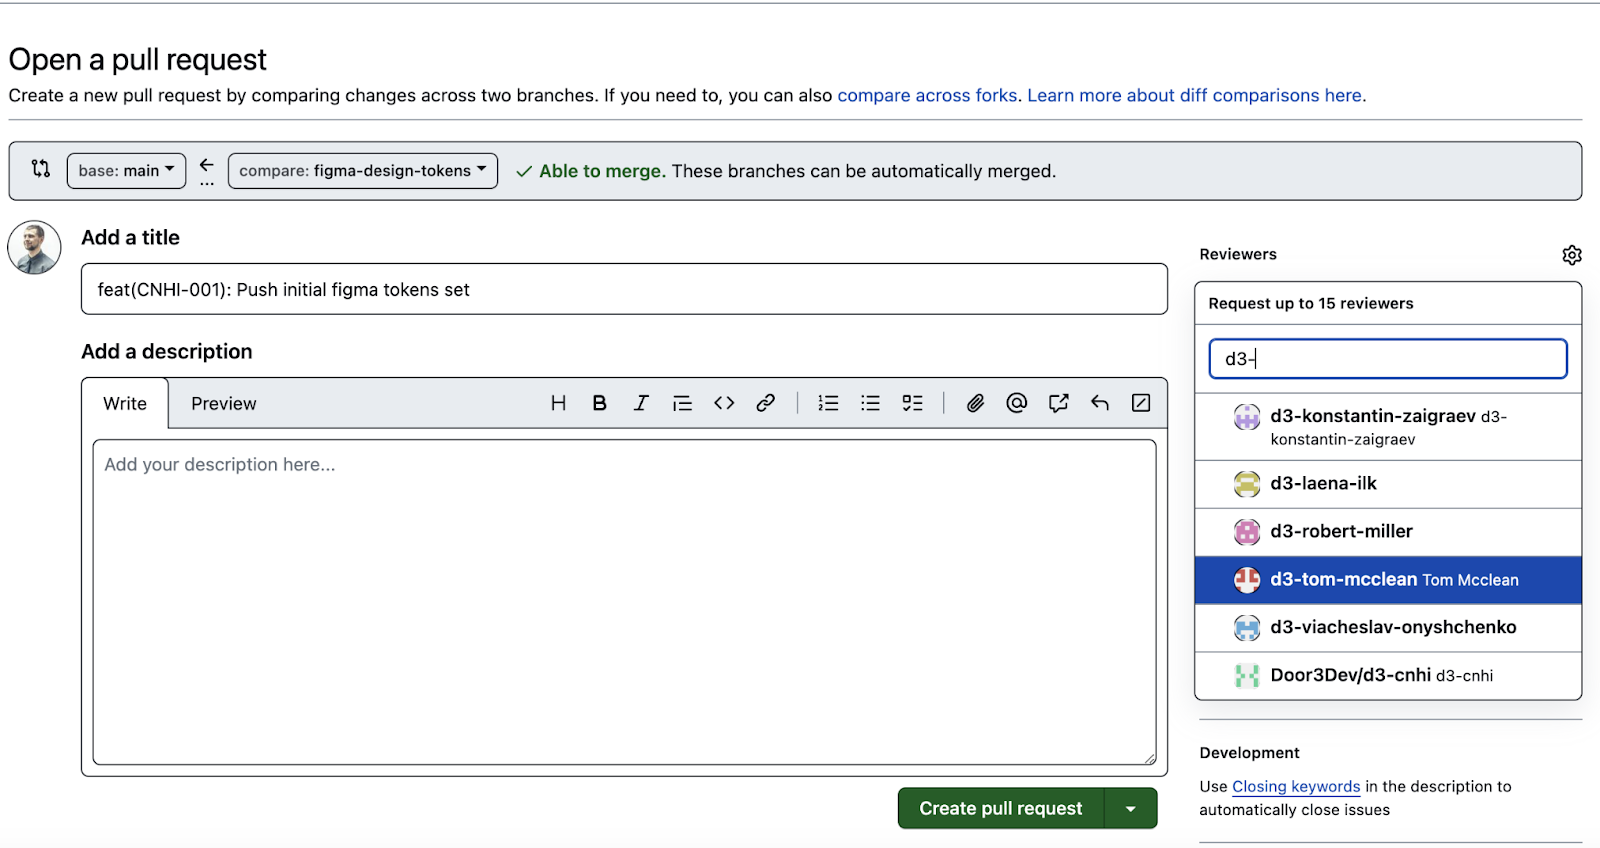
- On the Open Pull Request page, enter a title, select reviewers, and click Create pull request.
Congratulations!
You’ve successfully integrated Figma with GitHub! Your design tokens are now synced, making collaboration between designers and developers more efficient than ever.
Conclusion: Using Tokens in Development
One of the significant advantages of using GitHub is its robust version control and branching capabilities. For instance, if your team is working on a brand refresh, you can create a separate branch to explore new design tokens without disrupting the current production setup. Once finalized, these changes can be merged into the main branch.
After syncing your tokens to GitHub, they can be integrated into your development pipeline. Tools like Style Dictionary can transform these design tokens into code that can be used across various platforms, such as CSS for web development. This integration ensures that your design decisions are consistently applied throughout the development process, reducing the gap between design and implementation.
By setting up this integration between Figma, Tokens Studio, and GitHub, you create a streamlined workflow that enhances collaboration, maintains version control, and ensures that your design tokens are always up-to-date and accessible across your team. This approach not only saves time but also improves the accuracy and consistency of your design and development processes.
Stay tuned for the next installment of our ongoing series where we’ll discuss how to transform your tokens into development languages for use on specific platforms. Don’t forget, our “Mastering Design Tokens” workshop in Barcelona on November 7th.

¿Crees que podría ser el momento de traer ayuda adicional?
Lea estos a continuación...
.png )
.png )
.png )

Solicite una cotización de proyecto gratuita
Revisaremos su solicitud y le proporcionaremos una evaluación del costo del proyecto dentro de 1 a 2 días hábiles.
Solicite una cotización de proyecto gratuita